-
Peter J. Keleher authoredPeter J. Keleher authored

- Assignment 5: Tok: Firebase and Playing Video
- Versions
- Goals
- Approach
- Steps
- Step 1: Set Up Your Database and Create Your App
- Step 2: Lay Out Your Storyboard
- Step 3: Build the URL Uploader controller
- Step 4: Create a Video Player
- Step 4a: Reading Data from the Database (high level)
- Step 4b: Writing To The Database
- Step 4c: Build Your Sorting Heuristic
- Step 5: Going Live on a Shared Database
- Running on your phone (we will not test)
- Hints
- Grading
- Bonus Points
Assignment 5: Tok: Firebase and Playing Video
Due: May 17, 2020, 11:59:59 pm, v1.02
(live doc, be sure to check back frequently)
Versions
- 1.02: added valid database example to hints
- 1.01: added/fixed video
Goals
- learn to use external database, storage
- AVKit
Approach
In this project we are going to build a pared-down version of TikTok. You are going to build an app that allows you to upload URLs of online videos to a database, play those videos, and "like" your favorites.
We will be using the Firebase Realtime Database to store the URLs, "likes", and viewing information.
Quick demo available here
Steps
There are many steps to this project; I encourage you to start early.
Step 1: Set Up Your Database and Create Your App
In this step we are going to set up an iOS app and tie it into the database.
- Create a brand new app called
assign5in your repository.- single-view
- no tests
- bundle id must be
edu.maryland.cmsc436.spring2020.openTok, though we will possibly change this later.
- Go to http://firebase.google.com/ and
register for the free Spark Plan.
- Work through the this guide to setting up a project.
- Name your Firebase project
assign5as well, create a realtime database, and do not forget to downloadGoogleService-Info.plist - Your
Podfileshould consist of the following:
# Uncomment the next line to define a global platform for your project
# platform :ios, '9.0'

target 'assign5' do
  # Comment the next line if you don't want to use dynamic frameworks
  use_frameworks!

  # Pods for assign5
  pod 'Firebase/Database'
end- You do not need to know much about
Cocoapods. Create the above
Podfile in your top
assign5directory. Install Cocoapods on your machine if you don't already have it. Easiest is to usesudo gem install cocoapods, but if you don't have root access look here under "Sudo-less Installation". Then typepod installon the command line inside your topassign5directory. From then on, always open assign5.xcworkspace instead of "assign5.xcodeproj".
Try out your database! Go to https://console.firebase.google.com, create the realtime database if you haven't already, and then click on 'Database' (this is the realtime database). Click on rules:
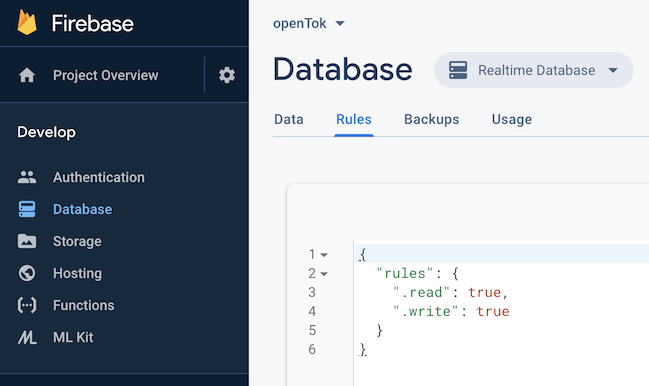
to set up the "test" rules, i.e. no authentication (Note that I spent many hours trying to set up authentication for the whole class, but eventually decided it was going be far more trouble that it is worth. For your own apps you should always use authentication. I recommend the FirebaseUI).
Now go to the data tab. Real-time means that as you insert data from your app, it will magically appear in the browser window (see the demo for an example). Assuming you have correctly set up cocoapods, the GoogleService-Info.plist, and your AppDelegate.swift (see the guide above), you should be able to place the following in the viewDidLoad() of your main view controller, run it, and watch the data appear in a browser window:
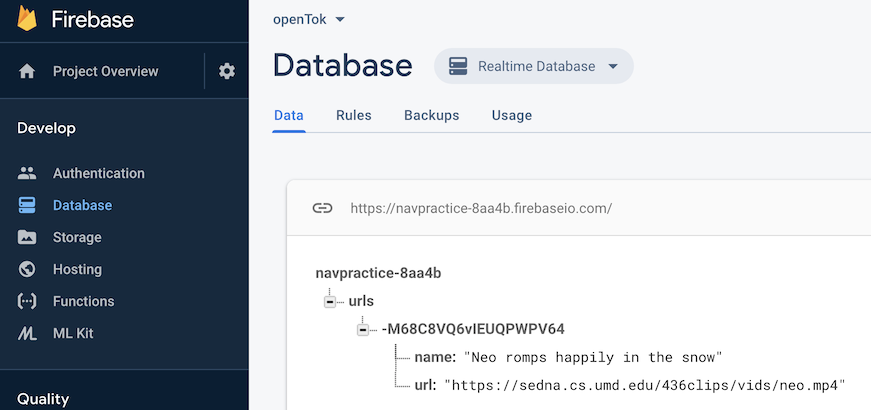
    let root = Database.database().reference()
    root.child("urls").childByAutoId().setValue(["name": "Neo romps happily in the snow", "url": "https://sedna.cs.umd.edu/436clips/vids/neo.mp4"])
You should see the following:
Step 2: Lay Out Your Storyboard
You should end up with at least three main ViewControllers: a PlayerController, a
URLController, and a MainController (the names do not matter, but using these should
make it easier to get
help). The MainController should have buttons to segue to the URLController
and the PlayerController. Create the segue on the storyboard by ctrl-dragging from
buttons to controllers, using the "Show" segue. Each of these three need to have
appropriately-named subclasses of UIViewController defined, and the ViewControllers on
the storyboard should have their identities set correctly.
Finally, select the MainController, and from the Editor menu select "Embed in Navigation
Controller". Make sure the arrow points to the navigation controller.
Make sure that at this point you can run the app, which should start in your
MainController. Clicking on either button should take you to another view controller and
hitting the "Back" button should take you back.
Step 3: Build the URL Uploader controller
This controller will just allow the user to input a URL, description (through TextFields), Edit: maybe a comma-separated "tags", and insert into
the database. A url and description can be inserted as follows:
root.child("urls").childByAutoId().setValue(["name": "Meditation Sheep",
                                             "url": "https://sedna.cs.umd.edu/436clips/vids/sheep.mp4"])
Use of the childByAutoID() guarantees a unique key, even with simultaneous insertions
into the database.
Use an "Upload" button or to affirmatively trigger the database insertion. After the data has been inserted, you then need to programmatically trigger going back in the navigator. Alternatively, you could trap the "Back" button, but then there would be no way for the user to go back without inserting data.
Note that you can edit and delete data in the database from the console browser window. Hover the mouse to the right of data and you will see options.
Step 4: Create a Video Player
There are many ways to go here. You could, in fact, draw out an AVKit Player View Controller, but it does not give you many options to customize. Note that aside from just
playing the videos, we want to display text over the video (the description, number of
likes), a button ("like"), and a gesture recognizer (or two). These are not easily built
on top of the default approach, but be my guest and try.
A slightly easier approach is to use a normal View Controller, put an AVPlayerLayer on
top of that, and give it an AVPlayer. Label and controls can then be attached to the the
view controller's main view. Using this approach can be as simple as:
let player = AVPlayer(url: URL(string: "https://sedna.cs.umd.edu/436clips/vids/horses.mp4")!)
let playerLayer = AVPlayerLayer(player: player)
playerLayer.frame = view.frame
playerLayer.videoGravity = AVLayerVideoGravity.resizeAspectFill
self.view.layer.addSublayer(playerLayer)
player.play()
Put this in your PlayerController file in the viewDidLoad() and you should soon be seeing a video.
What else do we need to do?
- Attach labels for URL description and the number of likes, a "Like" button (use unicode emoji symbols), and a tap/swipe recognizer for going to the next video all to the view controller's view. You will need to do this programmatically (not in the storyboard), including layout constraints. Your app should work well in both Portrait or Landscape modes. Google is your friend.
- read the URL and Like information from the database.
- write Like annotations back to the database
- a swipe up (single tap) gesture to skip to the next video and a swipe down (two-finger tap) to restart the current video. The swipe gesture are better for the actual device, but the tap gestures work better on the simulator.
Step 4a: Reading Data from the Database (high level)
Read the URLs from the database by creating an observer (firebase
docs) for the
path "root/urls" (w/ type .value). This observer is triggered every time data changes,
and happens asynchronously with respect to your app. The snapshot you get from this is not
easy to parse, see the Firebase docs for complete information.
The following is a snapshot of the database showing four URLS, two likes (only one opened), and also "Seen" information:
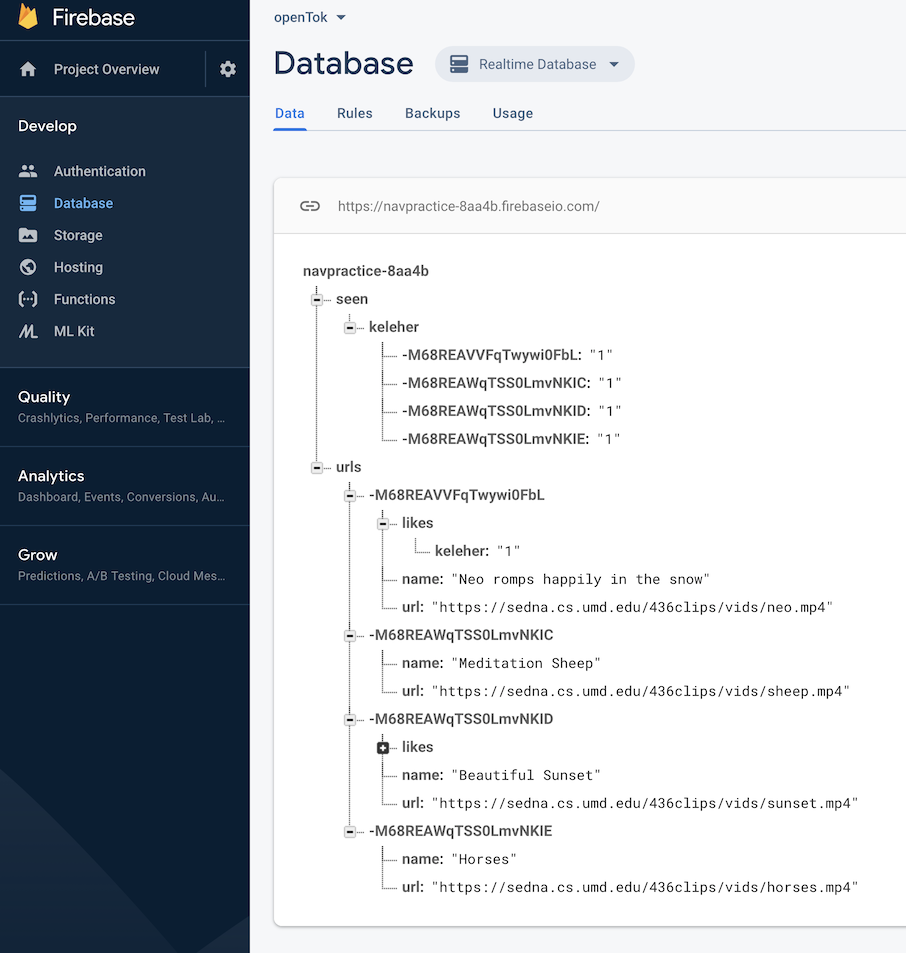
"Seen" information is just keeping track of which videos you have seen. You will use this information to inform your video sorting heuristic to prefer fresh new videos over those you have seen before.
Step 4b: Writing To The Database
In addition to writing new URLs to the database as discussed above, you also need to add "like" and "seen" information.
Add the "like" information under "urls//likes/", where "" is the id of the url, and " is your directoryid. The value does not matter.
Add the "seen" information under "seen/".
Step 4c: Build Your Sorting Heuristic
When your app goes live you want people to see videos that others have liked (high "like" count), but also fresh new videos (not in your "seen" data). Given a set of URLs pulled from the database, your sorting algorith should put all unseen videos first (order among them does not matter), and then sort the rest according to descending number of likes.
Through this approach you build a video "playlist".
However, your URL observer is always running, and may be triggered asynchronously because of new URLs or "likes" from other users. When to rebuild the playlist? There are many ways to go here, but these are my rules of thumb:
- Only rebuild the playlist if new URLs arrive, do not rebuild the playlist because of likes from other users.
- Rebuild the playlist when you come to its end to incorporate updated "like" info.
- Do not change the first element in the playlist when rebuilding based on new URL's. Your current video should not change.
With this scheme you can never have more than one like per video, as you only have one directory ID. However, the last stage of this project is going live on the same database as everyone else.
Step 5: Going Live on a Shared Database
After getting your code running on your own database, you can try running it against our shared database (which is where we will test it).
Please note: There are no permissions, and any one of you can blow away or mess up the entire database. Please be very careful when you start using this live database so as not to annoy all the other users.
Please also note: Uploading any inappropriate URLs will be reported to the proper university officials. There are 150 students in the class, from every conceivable background. This is not the place have fun with NSFW videos, or to argue your political stance. Please report any violations to me; I can track who inserted what into the DB.
Steps:
- Ensure that you are using your directory ID for both the "likes" and "seen".
- Replace your
GoogleService-Info.plistwith the following one: GoogleService-Info.plist. - Replace your bundleID with
edu.maryland.cmsc436.spring2020.openTok.<dirid>. This will no longer match the bundleID expected by the DB, but in its current permissive mode data will still be accessible.
Running on your phone (we will not test)
Need to make sure your phone trusts the developer. When attempting to run on your phone, you may receive a "signature not trusted by phone" or some such (this is not the exact wording). When this happens you can go into Settings / General / Devide Management and explicitly trust your developer signature.
Secondly, you may want to explicitly enable the app to use wireless data (though this might burn through your data plan quickly).
Hints
- You may upload URLs for recordings from anywhere (including those below), but try to keep them short (20-30 seconds, max).
- You can regenerate a reasonable, syntactically correct db as follows:
 let root = Database.database().reference()
 root.child("seen").setValue(nil)
 root.child("urls").setValue(nil)

 let vid1 = root.child("urls").childByAutoId()
 vid1.setValue(["name": "Neo romps happily in the snow",
                "tags": "dog,awesome,pet",
                "url": "https://sedna.cs.umd.edu/436clips/vids/neo.mp4"])
 root.child("seen/kendrick/\(vid1.key!)").setValue("1")

 root.child("urls").childByAutoId().setValue(["name": "Meditation Sheep", "tags": "sheep,peaceful",
                                              "url": "https://sedna.cs.umd.edu/436clips/vids/sheep.mp4"])
 root.child("urls").childByAutoId().setValue(["name": "Beautiful Sunset", "tags": "sunset,peaceful",
                                              "url": "https://sedna.cs.umd.edu/436clips/vids/sunset.mp4"])
 root.child("urls").childByAutoId().setValue(["name": "Horses", "tags": "horses,rural,peaceful",
                                              "url": "https://sedna.cs.umd.edu/436clips/vids/horses.mp4",
                                              "likes": ["someone": "1", "someone else": "1"]])
Grading
- 20 pts: general structure, w/ distinct view controllers for the main screen, the player, and the URL uploader.
- 10 pts: URL uploading
- 10 pts: playing even a hard-coded video URL. The video should take over the entire screen except the area at the top claimed by the navigation controller.
- 10 pts: showing vid name/description and number of "likes" over the top of the video (not to the side, should be layered on top of the playing video)
- 10 pts: sequentially playing the URLs in the DB. The player should to to the next video when the current video ends.
- 10 pts: ordering the URLs as above (unseen first, descending order of links otherwise)
- 10 pts: gesture recognizers (4)
- 10 pts: implementing the "likes" button and functionality
- 10 pts: general look and feel (my prototype would probably get a 6/10 for this).
Bonus Points
You may do at most one of these two bonus tasks. Each 15 pts, redeemable on final.
- Record and upload video from inside the app. You can upload anywhere you have access, though I suggest using Firebase Storage. Note that the Spark plan has a 1GB monthly limit of both storage and data transfer, so I suggest you keep your videos under 5MB. The AVCaptureSessionPresetLow preset might be appropriate.
- Resize or otherwise modify existing video in your app.